
This version lets a frame last as long as you want, turns the Export dialog into an asset-pack builder, and opens a lot more of other apps’ files the way they were saved.
- A frame can be pinned to its own length in milliseconds, with a colored strip on its header and a dialog with speed presets
- Export filenames take folders and name tokens, one export can write one file per slice, and the cells of a sheet can become animation frames
- Resprite, Pixquare and Pixaki files open; Pyxel Edit, Piskel, GraphicsGale, Pixelorama, Aseprite and Photoshop files open closer to the original, checked against thousands of real files
- Play loops the frames you selected, or the tag the playhead is in, and Enter plays from anywhere
- Hold Ctrl and point at a layer’s pixels to pick it and drag it
- Simple and Advanced modes are gone: every tool is always there
- Hold Ctrl+Shift over the grid to number its cells
- Files with a long history no longer freeze when you deselect or commit a transform
- A general round of bug fixes and improvements
As always, all feedback is welcome!
marcel0ll
Full changelog
What’s new:
Frame Timing · Asset-Pack Export · Other Apps’ Files · Playback and Timeline · Pick a Layer · Layouts · Grid · Base Color · Smaller Touches · Bug Fixes
Frame Timing
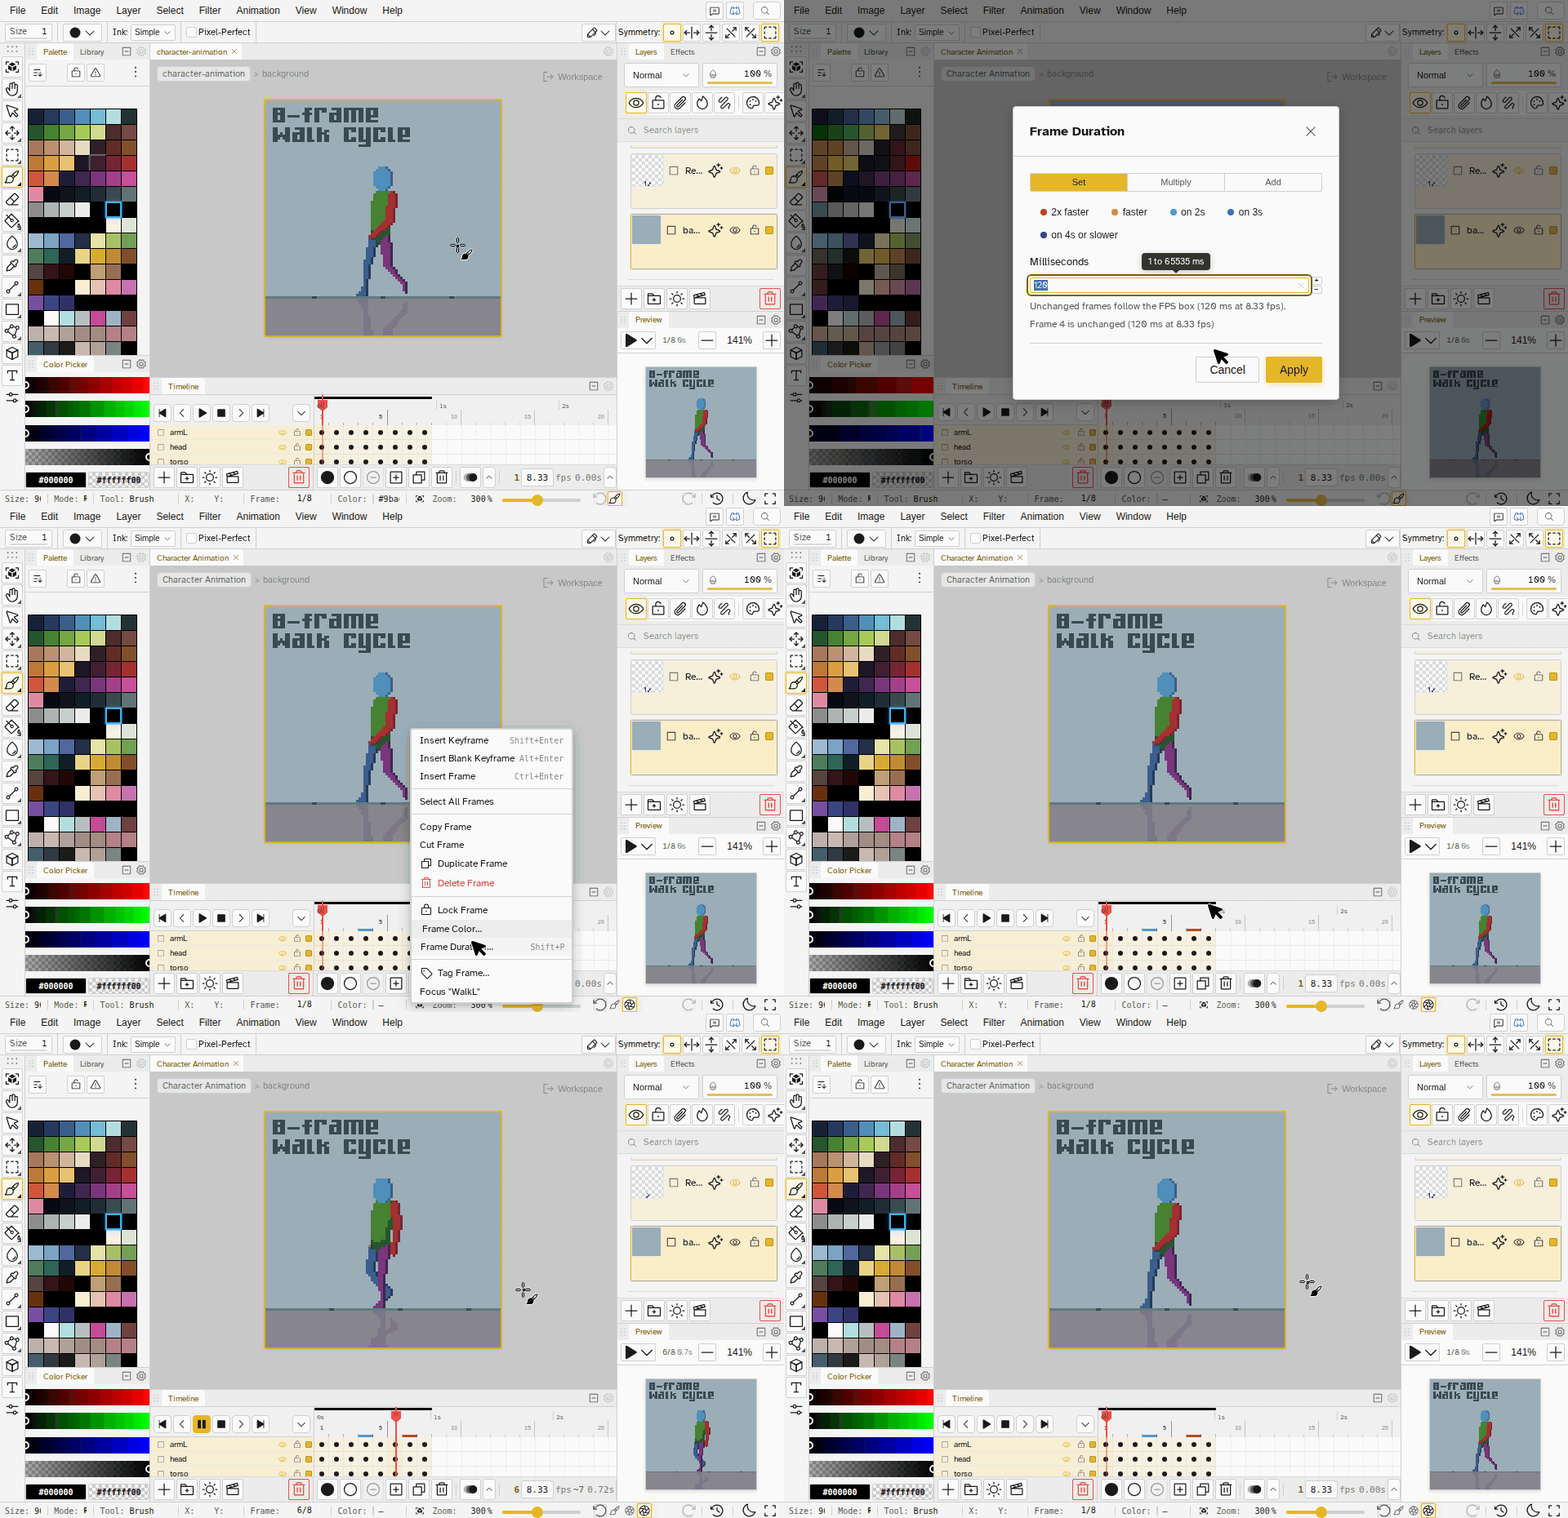
- A frame can have its own length. Right-click a frame header and choose Frame Duration…, or press Shift+P (P with the Aseprite keymap). Every frame starts out unchanged: it lasts one tick of the FPS box and follows it. Pin a frame to a length in milliseconds and it keeps that length whatever the FPS is, for a held pose, a quick smear or a pause before a hit.
- Speed presets. 2x faster, faster, on 2s, on 3s and on 4s or slower apply in one click; the X in the field returns the frame to unchanged. With a run of frames selected the dialog sets them all, and its Multiply and Add modes scale or shift the whole run at once. Every change is one undo step.
- See it in the timeline. A pinned frame shows a thin strip under its number, orange when it is faster than the FPS and blue when it is slower. Hover a header for the frame’s length, its speed as a multiple of the FPS tick, the selection’s total and the animation’s total length. The seconds ruler and the elapsed time in the footer count real time.
- Playback follows it everywhere: the canvas, the Preview panel, the hover thumbnails, and playback speed scales pinned frames too.
- FPS takes decimals. 12.5 FPS gives 80 ms frames. A file whose frames all last 70 ms opens at that exact rate with nothing pinned.
- Your files keep it. .nova saves it, and Aseprite, GraphicsGale, Pixelorama, Pyxel Edit, Pixquare, Pixaki, Pixilart, .ani, GIF and APNG files open with each frame’s own timing instead of being stretched into held copies. GIF, APNG, sprite sheets, engine packs, video, and Aseprite, GraphicsGale, Pixelorama, Pixilart and .ani files write every frame’s real delay back out.
- GIF export names frames under 20 ms before it writes, since most players slow them down. Normalize frame timing explains itself in a tooltip and starts from the export’s own FPS.
Asset-Pack Export
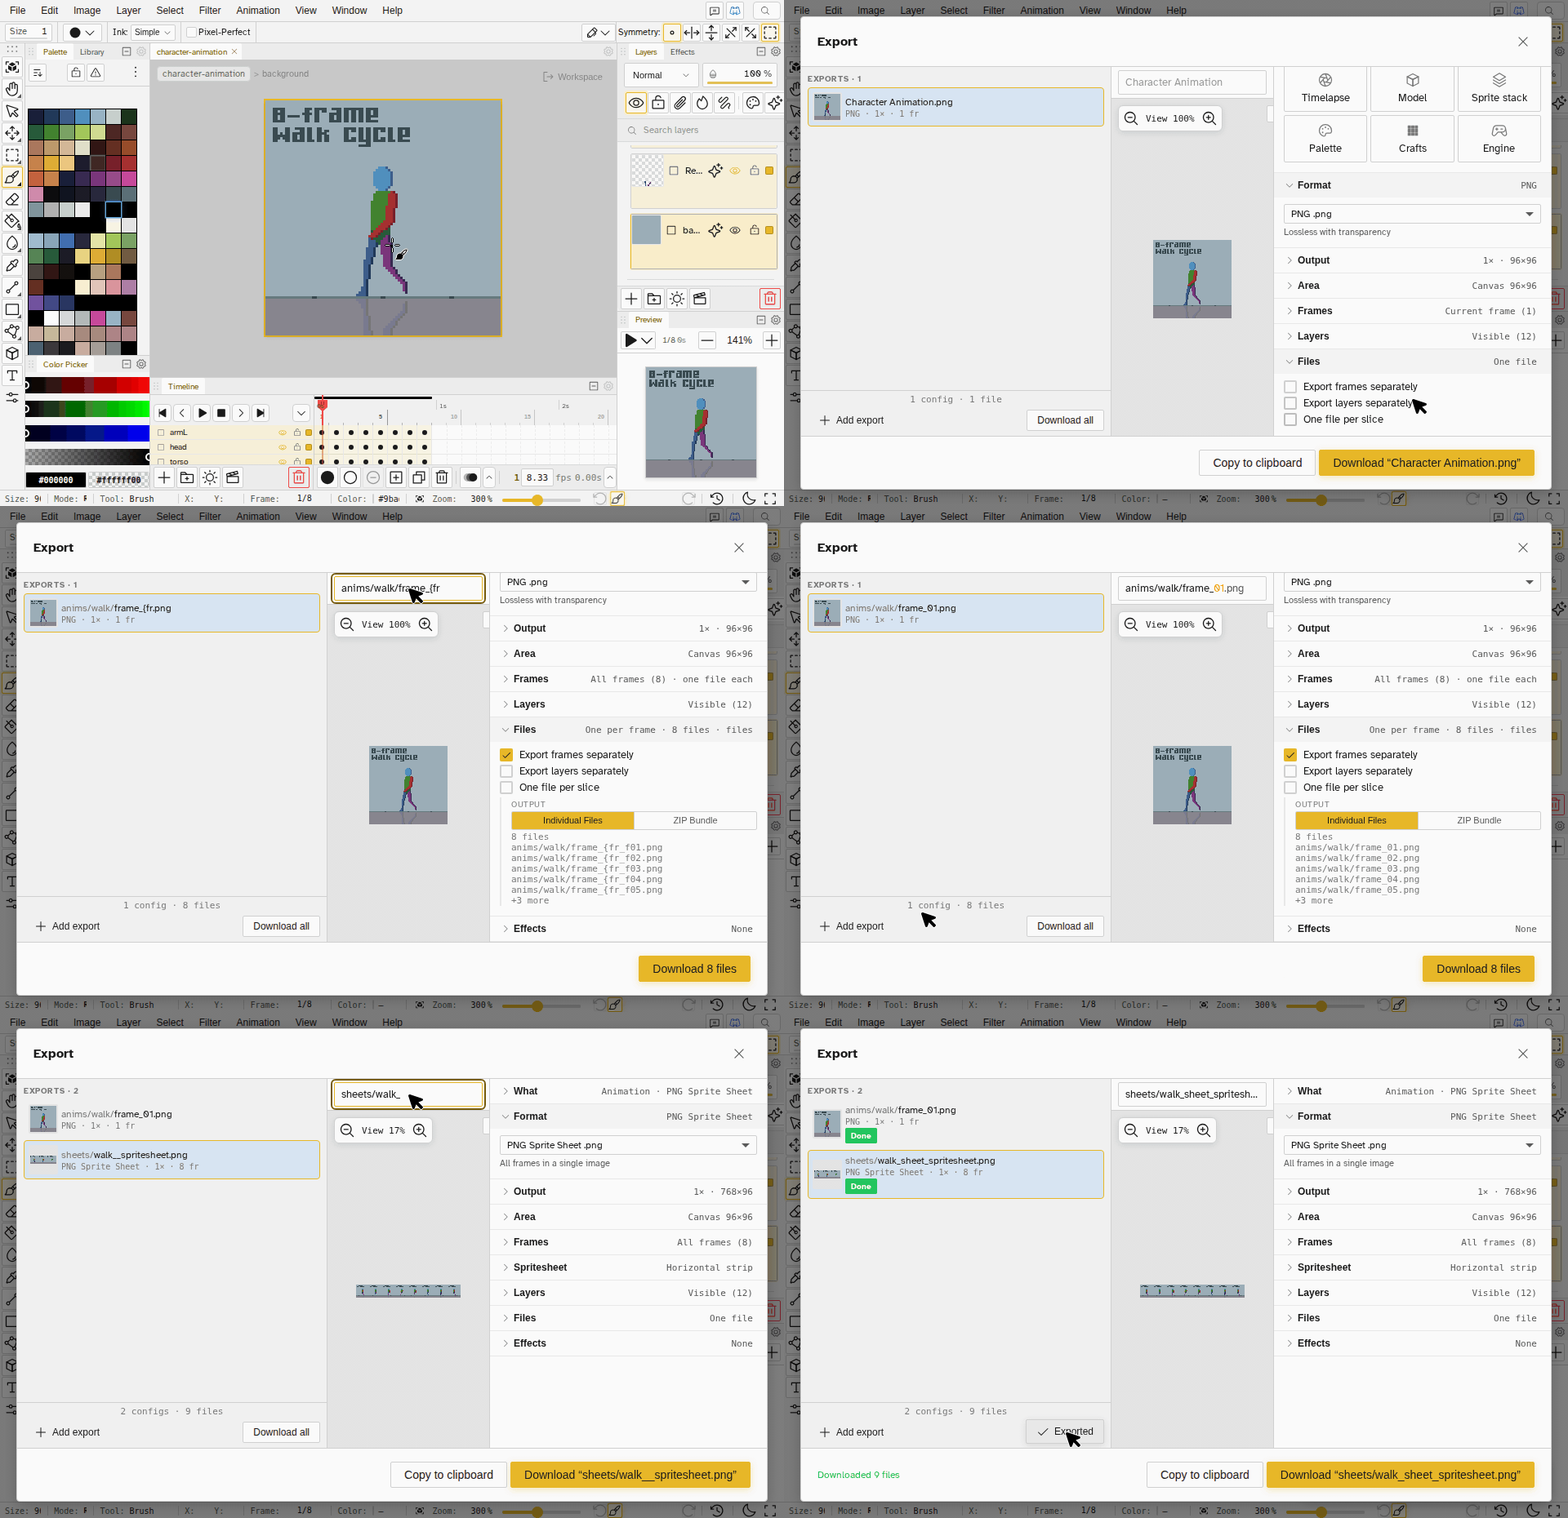
- Folders in the filename. sprites/hero lands as hero.png inside a sprites folder: inside the zip on the web, and on disk in the desktop app, where Export all writes into a folder you pick once per file, shows it above the button, and asks before replacing files (tick Don’t ask again to stop it).
- Name tokens.
{slice_name},{slice_index},{tag},{layer}and{frame}fill in the name of each file an export writes, and{frame:3}or{slice_index:2}pad with zeros.anims/{tag}/{frame:2}with Export frames separately writes anims/idle/01.png, anims/idle/02.png, anims/jump/03.png. Tokens light up as you type, an unknown token gets a warning under the field, and a doubled brace writes a brace. - One file per slice. Tick it in the Files row and the export is written once for every slice, each file cut from its own slice; a name filter such as monster_* picks which. Split Image can name the slices it makes with a pattern, so a 10 by 11 sheet becomes monster_01 to monster_110 in one go.
- Cells of the area as frames. With Animation picked, the Frames card can cut the area into a columns by rows grid and play each cell as one frame, all of them, one row or one column, so a one-frame sprite sheet still becomes a GIF.
- A typed Area. The Area row takes X, Y, width and height in canvas pixels, seeded from your selection, so an export keeps its rectangle after the selection is gone. Use current selection fills the fields again.
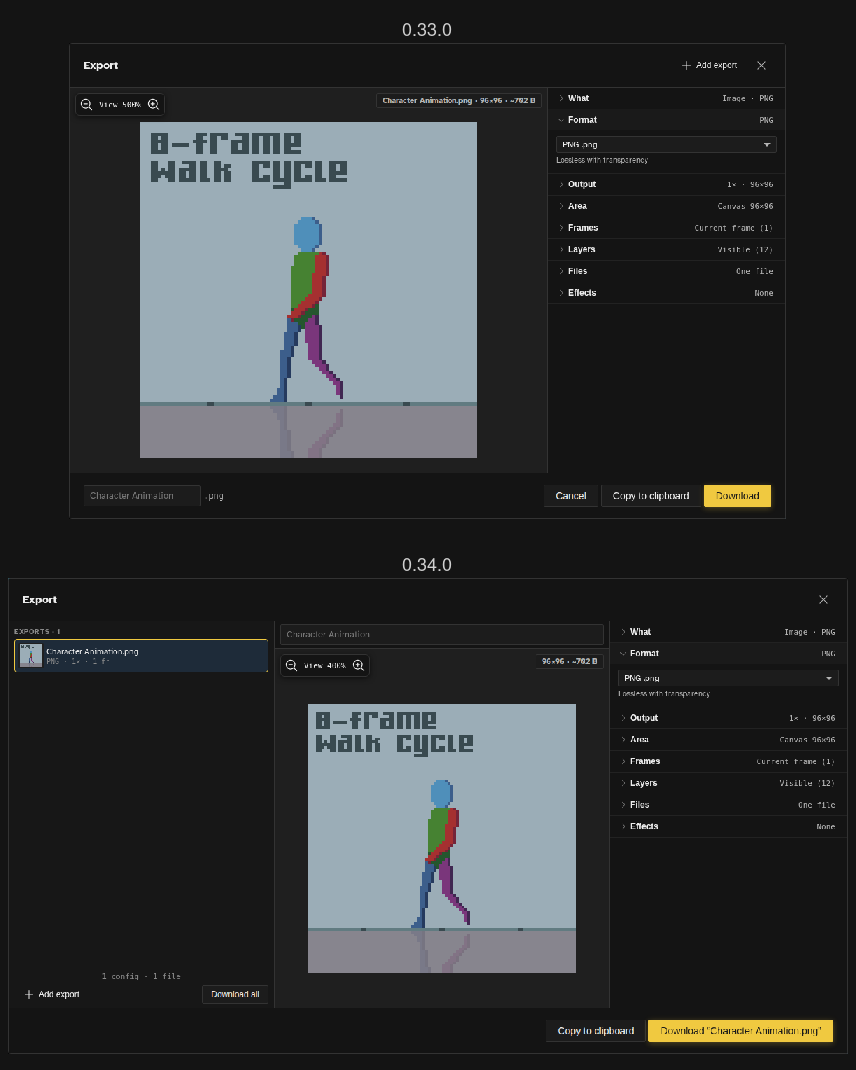
- The dialog is laid out for many exports. The list is always on the left with Add export and Download all (Export all on desktop) under it, a note above them counts what the run will write (3 configs · 9 files), the filename and its preview sit in the middle, and a multi-file download is one zip named after your file (
hero.zip, no longerhero_all.zip); the archive name field is gone. - One Export all can write a whole pack. A 110-monster sheet with one folder per monster holding its own sheet and four walking GIFs is 551 files from one click, and the next Export all refreshes every one of them after an edit.
- Godot exports split per tag write one flat zip with a folder per tag instead of a zip of zips, and a slice key lands on the exported frame it shows on.
Other Apps' Files
- Resprite files open, with layers, groups, blend modes, clipping, frame durations, clips as tags and the palette. Tilemap layers open empty and a notice names them.
- Pixquare and Pixaki files open with their contents. Pixquare .px files opened with every cel blank; now the layer tree, groups, clipping, palette, tags, frame timing and indexed artworks come through. Pixaki 4 packages open as iPad sharing writes them.
- Pyxel Edit animations open as frames with a tag each instead of one frame, blend modes map to their Novaboard names, gaps in the palette keep their place, and older files whose layers opened invisible show again.
- Piskel files that failed to open (single-sheet layers, including Piskel’s own test files) open, older Piskel files open with the right colors, a stopped preview opens at 12 FPS, and exporting to .piskel warns when the file has semi-transparent pixels, which Piskel cannot hold.
- Photoshop files keep the order of nested folders, open when they have no layers, and the large tilesets that were refused as too big open. Clipping masks look the way Photoshop and GIMP draw them. The reader was checked against 399 real PSDs with GIMP and Krita as the reference.
- GraphicsGale files from GraphicsGale 1.x open, including its own sample files. Files 256 pixels or wider no longer open empty, 4-bit files are no longer scrambled, hidden and same-named layers survive, per-frame delays come in and go out, and a .gal written by Novaboard now opens in GraphicsGale with its layer opacity intact.
- Pixelorama files from 0.8 to 0.11 open, tags land on the right frames with their colors, groups keep their opacity, blend mode and nesting on the way out, symmetry axes travel too, and dropped effects, tilemaps and 3D layers are announced.
- Aseprite files with tilemap layers open, the most common reason a file was refused. The tilemap layers come in empty with a notice; everything else is intact. Held runs export as one frame with the run’s whole duration.
- An unsupported file type says so. Opening or dropping a file Novaboard cannot read shows a message naming its extension instead of doing nothing.
- The history’s first entry is Imported with the file’s name, not Blank canvas.
- Checked against real files. The readers were run over thousands of files gathered from GitHub, OpenGameArt, itch.io and the apps’ own samples, with the original apps as the reference where one could be scripted.
Playback and Timeline
- Play loops the selected frames. Select cels on two or more frames, gaps allowed, and Play loops just those. The selection is the loop: click outside it or press Escape and Play goes back to every frame.
- Play loops the tag under the playhead. With Tags on in the Playback settings menu (the default), Play loops the innermost tag the playhead is in, and Previous, Next and Stop stay inside it. The Preview panel and the file grid’s hover thumbnails follow the same rule.
- Enter plays and pauses from anywhere, except while a multi-point shape is collecting points, where it finishes the shape. Arrow keys step the frame and layer unless a marquee or transform is live. Escape applies a move or transform, arrow nudges included, and backs out one level per press: the marquee, then the cel selection, then playback.
- The playhead follows you. Dragging across frame headers or cels moves the playhead to the frame under the pointer, and a single selected cel moves along with the playhead.
- Delete Frame and Duplicate Frame act on every selected frame, gaps included, and duplicates land as one block after the last one. The badge names what you picked: “3 frames” for whole frames, “5 cels” otherwise.
- Paste after the last frame. Click the empty slot past the last frame and Ctrl+V appends the copied cels there.
- A Tag Frames button at the end of the timeline footer tags the selected frames, or the playhead frame, and puts you in the new tag’s name.
- F2 renames the focused layer row in the timeline.
Pick a Layer
- Hold Ctrl and point at the art. The active layer is outlined, and over another layer’s pixels that layer lights up in orange. Ctrl+press makes it the active layer, and the same drag moves it. The topmost visible layer wins, layers inside groups are picked themselves, and a locked layer is picked but not moved.
- With the Transform tool, the press boxes the picked layer and drags it through the transform, and a double-click on another layer’s pixels picks it. Reference images can be picked and moved the same way.
- Ctrl+drag inside a marquee you drew leaves a copy, unless a layer above the active one has pixels under the pointer: then Ctrl picks that layer instead. On a box picked because nothing was selected, Ctrl+drag moves, and that box goes away when the transform commits.
Layouts
- Simple and Advanced modes are gone. Every tool, panel and feature is always there. Window > Layouts lists a built-in Default layout first, then your saved layouts, and View > Reset Layout gets you back to it.
- If you used Simple mode, your panel arrangement is kept; Window > Layouts > Default brings back the full set of panels.
- New Frame opens the timeline when its panel is hidden, instead of doing nothing.
Grid
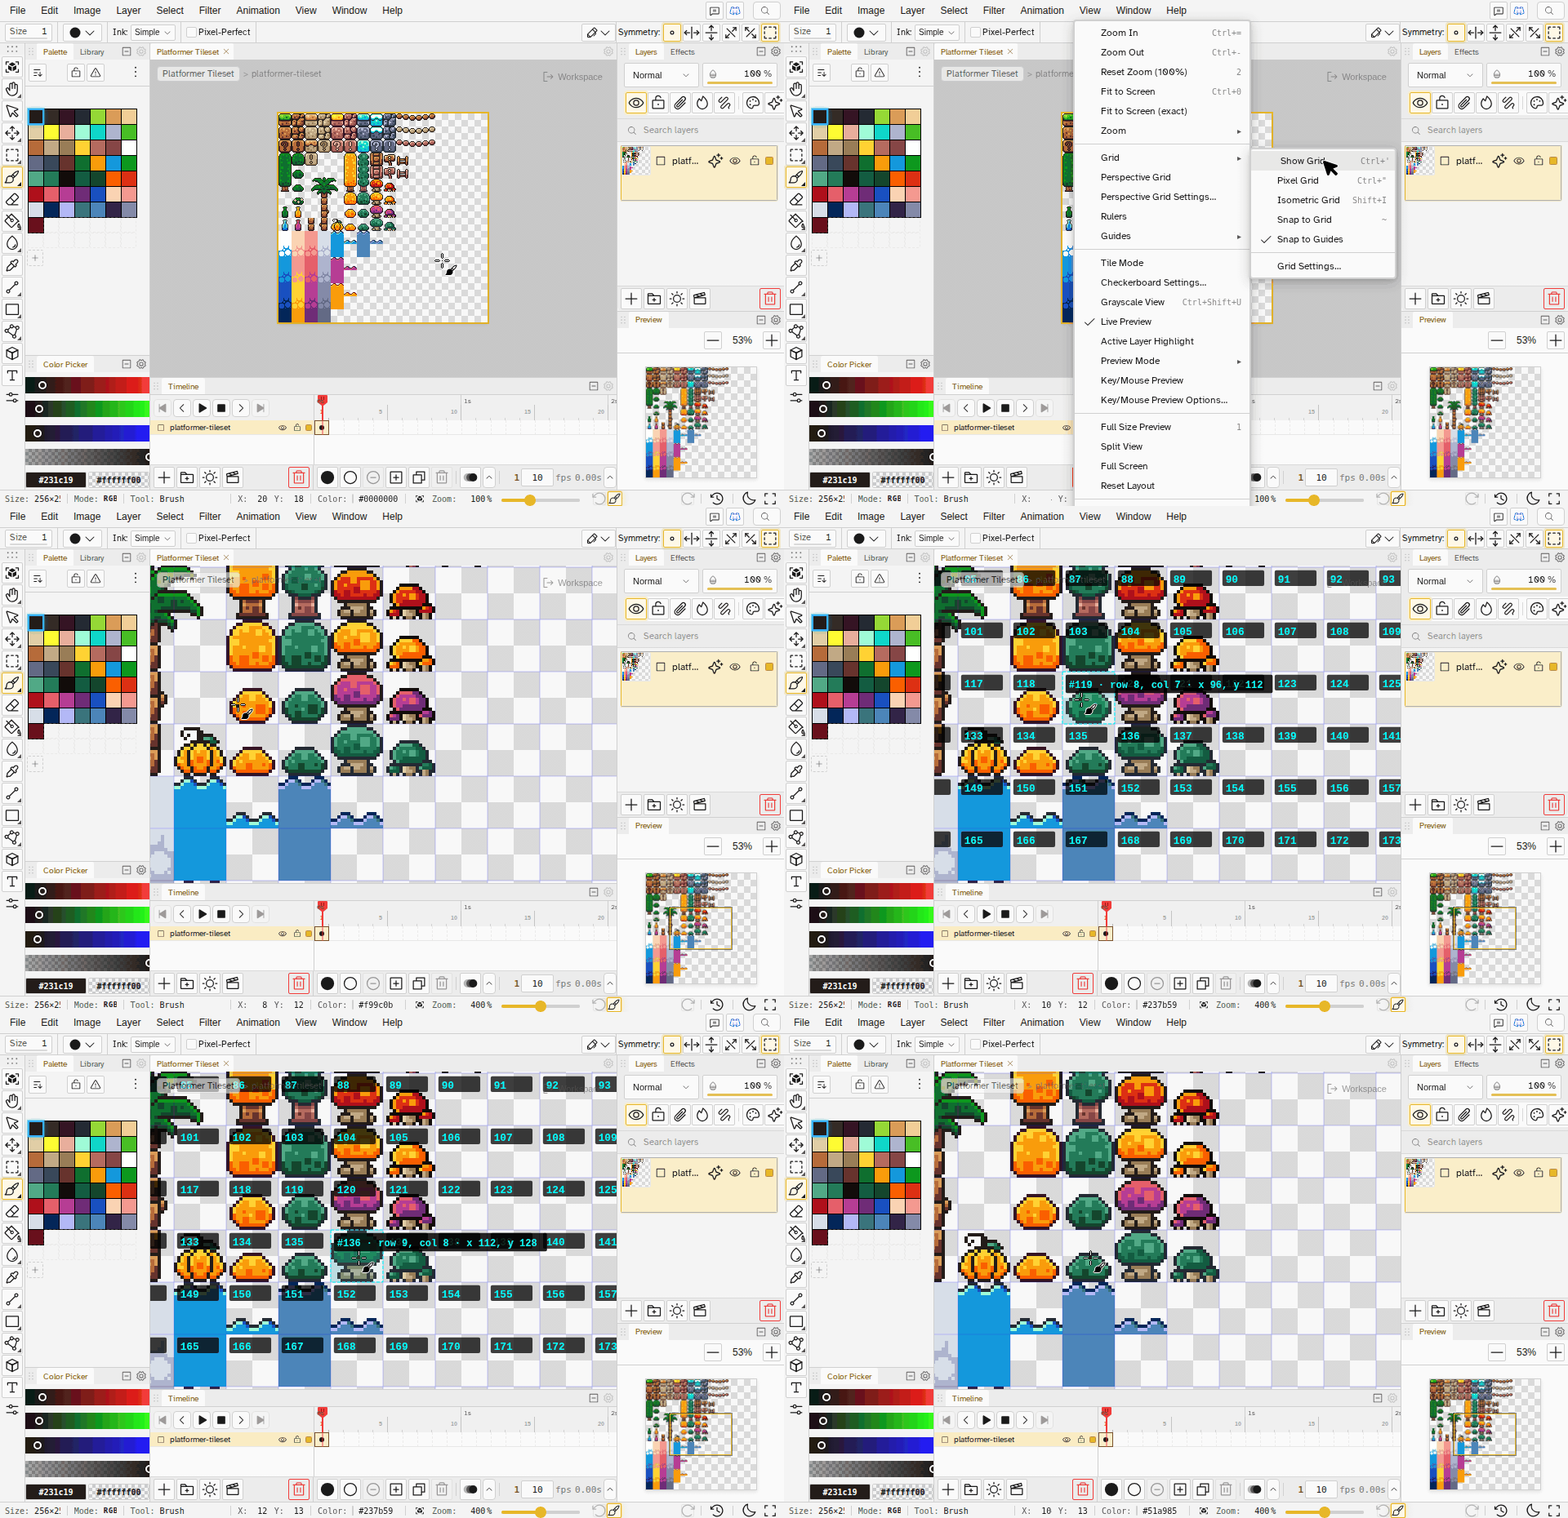
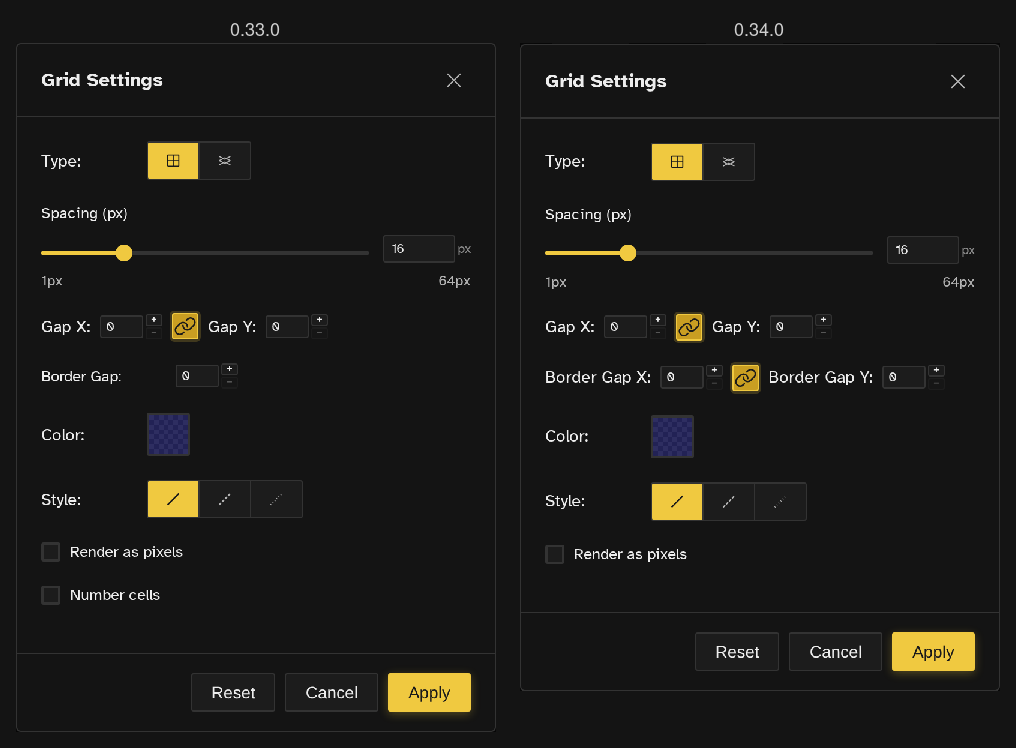
- Hold Ctrl+Shift to number the cells. Once you are zoomed in enough to read them, every cell shows its number, counting left to right and top to bottom, and the cell under the pointer is outlined with its number, row, column and pixel position. Release the keys and the overlay is gone. It replaces the Number cells checkbox.
- Border Gap X and Border Gap Y in Grid Settings, with a link button that keeps them together.
Base Color
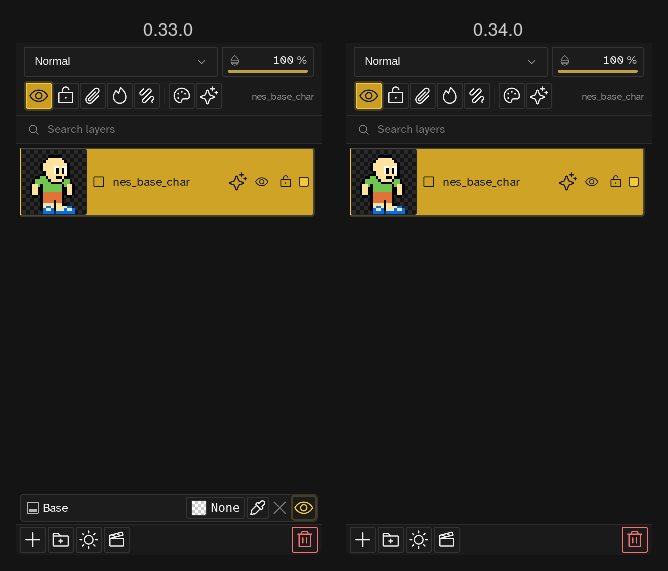
- The Base row leaves the Layers panel. On an indexed file, View > Show Base Color, or Show as backdrop in the base swatch’s menu, paints the base entry’s own color behind the canvas, the preview and the thumbnails; off, you see the checkerboard. The choice is undoable.
- RGBA and grayscale files have no base color. A file that had one opens with a draft layer named Base at the bottom of the stack, filled with that color, so it looks the same on the canvas and you can edit it like any other layer. Draft layers are left out of exports: to export with the color, turn off Draft Layer on that layer (right-click > Toggle, or Unmark as Draft in the Layers panel).
- Exports follow it. Flattened exports include the shown base color, exports that keep transparency leave it out, and PNG exports carry it as the image’s background color.
Smaller Touches
- Your default palette reaches New File. A saved library palette picked in Preferences is what a new file gets, and the dropdown lists your palettes before any file is open.
- Color fields on an indexed file offer palette slots. Effects (Palette Swap included), Outline, Anti-alias and Auto-shade pick from the palette, so the field matches the canvas.
- The Transform fields show the painted box. Before you drag anything, X, Y, W and H describe the pixels inside the selection, so typing one less than the shown X moves the art one pixel.
- The Library has its own undo. Rename, move, folder and delete in the Library panel answer Ctrl+Z and Ctrl+Shift+Z while the panel has focus, and the delete toast reverts the same step.
- Clipping masks draw like Photoshop and GIMP. Clipped layers over a see-through base look the way they do in Photoshop and GIMP, on every renderer.
- Adjustment layers honor their blend mode, and Bake Effects is disabled on them instead of emptying their effect list.
- The Bucket has its own pattern slot, so a custom brush on the Brush no longer tiles every fill; pick a stamp while the Bucket is active to give its fills a pattern. Use as brush arms the Brush and switches to it, and Fill Tool Preview is the one switch for the bucket’s hover preview.
- Typing into a number field is one undo step. Layer opacity and the other scrub fields commit on Enter or when you leave them, and Escape reverts.
- Image Size shows what Apply writes. The preview samples the same pixels, and a dropdown near the bottom of a dialog opens upward instead of being clipped.
- The Transform tool’s Algorithm choice is honored when you commit, and CleanEdge runs on software renderers too.
- Hidden guides no longer snap lines, marquees or dragged content.
- The canvas stays in view. Panning stops once the canvas edge reaches the edge of the editor, a turned canvas stays put while you pan, and the “outside the view” notice is gone.
- New File offers the starters once, to first-time users, and opens on Blank after that. Picking a starter shows its details before it opens.
- Send to New Layer puts the new layer right above the selected layer and its clipping masks, or inside the active group, like the other new-layer commands.
- The Slice tool’s icon is a pair of scissors, everywhere it shows.
- Files with a long history stay responsive. Deselecting or committing a transform no longer freezes them for several seconds, a file with over a thousand saved steps opens in under four seconds instead of eighteen, saving no longer stalls the canvas, and strokes on layers inside groups redraw less.
- A tag’s name prints on its timeline bar when the bar has room for it.
- Search by the name you know. The Command Palette and the shortcut editor find commands under their Aseprite and Photoshop names, such as frame properties, sprite size, paint bucket or layer via cut.
- Repeat Last Export is the one name for the command and the File menu item. The PSD hint says what the chosen mode does with groups. Default FPS goes up to 120. Remove Keyframe counts what it removes. The Slices panel’s key label follows Frame Numbers Start At 0 and no longer overlaps the Add key button. The phone menu is translated.
Bug Fixes
- Edits made right after a file opens are kept. Strokes, undo and other commands made while the file was still being checked for another tab now wait and land, instead of being refused.
- Saves work again after a file is trashed in one tab and restored in another.
- Keymap presets keep the default gamepad buttons, held pad buttons fire a command once (only scrubbing repeats), and the Photoshop keymap keeps Close Tab off Ctrl+F4, which closes the browser tab on Windows.
- Undo after a palette edit on a file made before 0.33 no longer brings back the hidden transparent swatch.
- Trashing or unloading a file armed as a brush disarms the Brush and Eraser instead of leaving them stuck.
- Sticky modifiers no longer latch after a wheel gesture.
- Across frames skips locked frames on every layer, and Swap refuses an object that would end up inside itself.
- Stamping a mirrored selection paints its mirrored pieces too, mirrored pieces across a tile seam keep their palette slots, and a color picked in one file no longer stays tied to that file’s palette slot in the next.
- A command on a mouse button fires only from a press on the canvas, the shortcut editor refuses to take away the last mouse button that draws, and a native drag leaves no frozen brush cursor behind.
- Desktop: File > Exit and Ctrl+Q quit (saving or asking first). On Windows and Linux, Ctrl+W closes a tab, Ctrl+Shift+W closes all tabs, Ctrl+N makes a new file, and the window title names the file with a * while it is unsaved. Saving moves a file to the top of Open Recent, autosave writes a changed file even after its tab closed, the “saving is taking longer” warning no longer covers the quit dialog, and the installer is smaller.
- The Bucket with Lock Alpha fills again instead of failing on every click, and a file that turned read-only after Safari restored the page takes its lock back.
- A cel emptied by Delete clears its layer thumbnail instead of showing the old picture, also after a reload.
- GIF imports keep transparency. A GIF’s transparent color is the see-through base, so erased pixels show the checkerboard.
- A file that cannot be read says why: cut short or damaged, or not the format its extension claims.
- A brand-new empty workspace gets its first-run New File offer.
- A rotated rounded rectangle keeps all four corner radii.
- Many smaller fixes to translations, the docs and file imports.